Documentation
Table of contents
1. Introduction
Our platform has been designed with your business's autonomy, efficiency, and security in mind. Unlike traditional management systems, Shop Tools gives you complete control over your information, allowing you to use your own cloud storage infrastructure to manage every aspect of your business operations.
This documentation has been structured to guide you step by step, from initial setup to mastering our advanced automation tools.
- Data Sovereignty: You are the sole owner of your information. By integrating your Google Drive or Dropbox account, all records are stored directly in your personal space, guaranteeing privacy and permanent access.
- Comprehensive Management: From inventory and supplier control to sales registration with mobile scanner, everything is centralized in an intuitive interface.
- Innovation in Customer Service: With our exclusive queue management system, you can modernize your customer service through automatic WhatsApp notifications and digital appointment scheduling.
- Mobility: Turn any smartphone into a work tool thanks to the integration of QR codes and real-time barcode scanning.
Below, you'll find details of each module so you can start boosting your business today.
2. User registration
The user registration process on the Shop Tools platform is carried out using an email account, in which you must grant permissions for the creation of files in your cloud storage unit, which may be Google Drive or Dropbox. If you do not grant permissions, you will not be able to use the tool, as the data generated will be stored in this space.
3. Company registration
The onboarding and initialization process in Shop Tools requires establishing a secure and customized technical environment. To guarantee the integrity, backup, and portability of all your company’s financial and commercial information, the platform utilizes a decentralized cloud-based storage system. Before you begin logging transactions, it is an essential requirement to link the application with your trusted storage provider, either through the official Google Drive or Dropbox APIs.By granting these read and write permissions, you allow Shop Tools to create a secure, automated directory within your personal cloud account. This private space will host all periodic backups, configuration files, encrypted databases, and analytical reports generated by the software. This mechanism completely eliminates the risk of losing sensitive information due to local hardware failures, ensuring that your business data is always available, protected under banking-grade standards, and under your absolute control.Once a successful synchronization with your cloud storage is established, the system will automatically redirect you to the Business Identity Registration Form. This step is fundamental for tool parameterization, as each business operates under completely distinct fiscal, geographic, and operational realities. In this form, you must record your company's structural data in detail, including:Business Name and Tax Identification: Official data required for the subsequent issuance and customization of vouchers, receipts, and internal financial reports.Base Currency and Tax Regime: Defines the native currency in which all purchases and sales will be calculated, as well as the tax percentages (such as VAT) applicable to your products.Contact Information and Location: Physical address, phone numbers, and emails that will serve both for the header of your commercial documents and for configuring automated alerts.
4. Dashboard
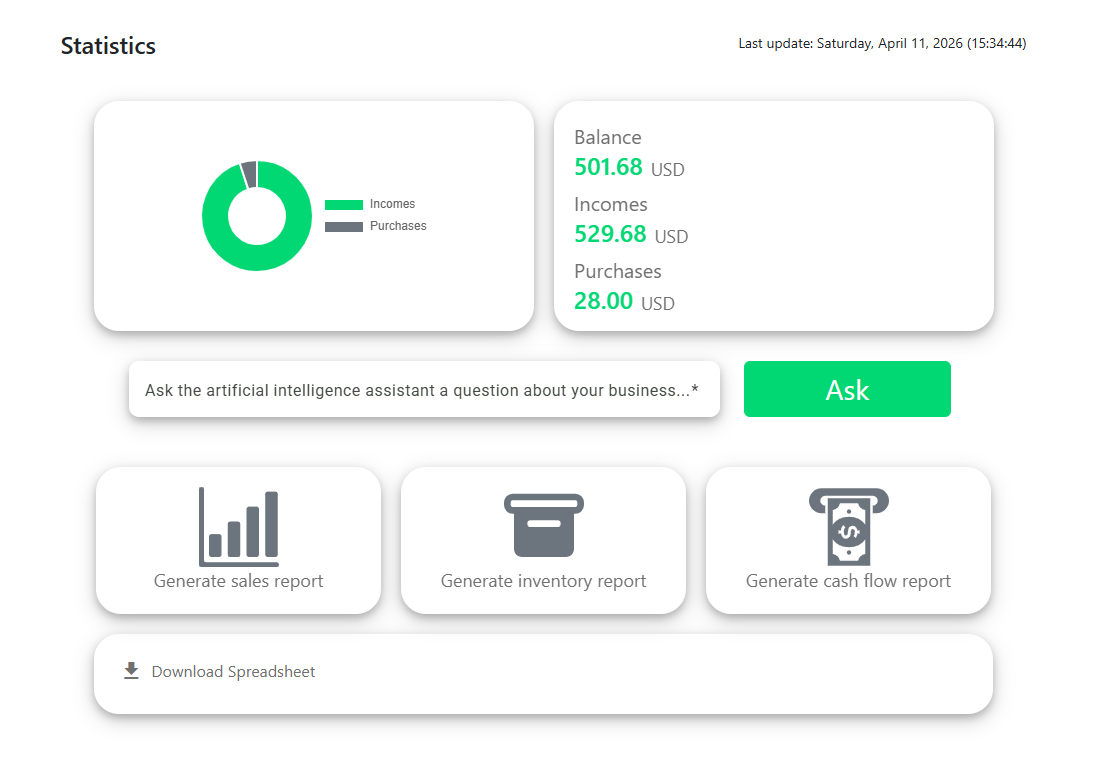
The centralized Shop Tools dashboard has been engineered as the core business intelligence hub for your commerce. It functions as an interactive command center that collects, processes, and synthesizes all of your company's operational and financial movements in real time. Instead of combing through complex spreadsheets or physical accounting ledgers, this panel transforms raw data into easily understandable visual metrics, enabling business owners and managers to make immediate strategic decisions backed by accurate, reliable information.
5. Company settings
In the upper right corner of the screen, you will find the “Settings” option, which allows you to modify your company's information if necessary.
6. Operations management
Operation creation
To create a transaction, press the “Add operation” button at the bottom right of the screen, and a modal window with a form will appear. First, select the type of transaction, which can be “Income,” “Expense,” “Payable,” or “Receivable,” then indicate whether this transaction is associated with a new customer or supplier or an existing one (if it is a new one, you must register their details; otherwise, select one from the list that will be displayed). You can then select the products to be invoiced and add them to the cart. You can add them manually using the drop-down list or by using the mobile barcode scanner, which is activated by scanning a QR code with your smartphone. Finally, you must select the payment method and press “Add operation.”

Activate barcode scanner
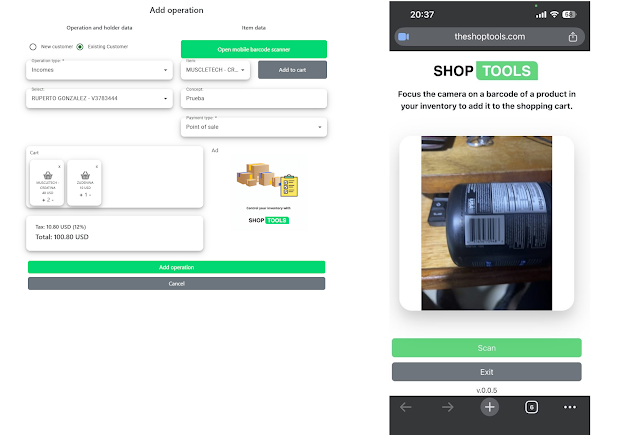
To activate the barcode scanner, press the “Open mobile barcode scanner” button, and a QR code will appear on the screen that you must scan with your smartphone. A web browser will then open on your phone with a website where you must start the scanner to activate the phone's camera. Finally, point the camera at the product's barcode and press the “Scan” button.
Operation modification
To modify an operation, press the pencil symbol on one of the records in the list and a modal window will appear with the operation details. Only the concept, payment method, and type of transaction may be modified.
Operation removal
To delete an operation, you must press the trash can symbol located on the right side of the record in the list.
Download transaction receipt
To download the transaction receipt, select the transaction type symbol located in the list and a window will appear with the transaction information. At the bottom, click on the “Download PDF” button.
7. Inventory Management
The stock catalog is the most vital dynamic asset of any commercial enterprise. To guarantee an agile workflow at the point of sale and prevent human errors in merchandise counting, Shop Tools features an optimized engine for indexing and registration of new items. This digital onboarding process has been engineered to be intuitive, centralized, and instantly executable.To initiate the process of incorporating a new item into your database, you must navigate to the inventory section and press the interactive 'Register product' button, which is permanently located in the bottom right corner of the interface's main screen

Item registration
To register an item, press the “Add Item” button at the bottom right of the screen. A modal window will then appear with a form that you must fill out with the requested information.
Item modification
To modify item data, click on the pencil icon in one of the records in the list and a modal window will appear with a form containing the product data to be updated.
Item removal
To delete product data, click on the trash can icon located on the right side of the record in the list.
View and download barcode
To view a product's barcode, press the eye symbol in the list, and the associated code will be displayed on the screen with the option to download it below.
8. Customer Management
In this section, you can register the details of your business's different customers.
Customer registration
To register a customer, click on the “Add customer” button at the bottom right of the screen. A modal window will then appear with a form that you must fill in with the requested information.
Modifying customers
To modify a customer's information, press the pencil symbol on one of the records in the list, and a modal window will appear with a form containing the customer's information to be updated.
Deleting customers
To delete a customer's information, press the trash can symbol located on the right side of the record in the list.
9. Supplier Management
In this section, you can register the details of your business's different suppliers.
Supplier registration
To register a supplier, click on the “Add supplier” button at the bottom right of the screen. A modal window will appear with a form that you must fill in with the requested information.
Modifying suppliers
To modify a supplier's details, click on the pencil icon in one of the records in the list and a modal window will appear with a form containing the supplier's details to be updated.
Deleting suppliers
To delete a supplier's details, click on the trash can icon on the right-hand side of the record in the list.
10. Customer Queue Management
In this section, you can set up a customer appointment scheduling system for your business. This feature is very useful for restaurants, clinics, banks, and butcher shops. When a customer is assigned an appointment, they receive a notification via WhatsApp letting them know it’s their turn.
Dashboard
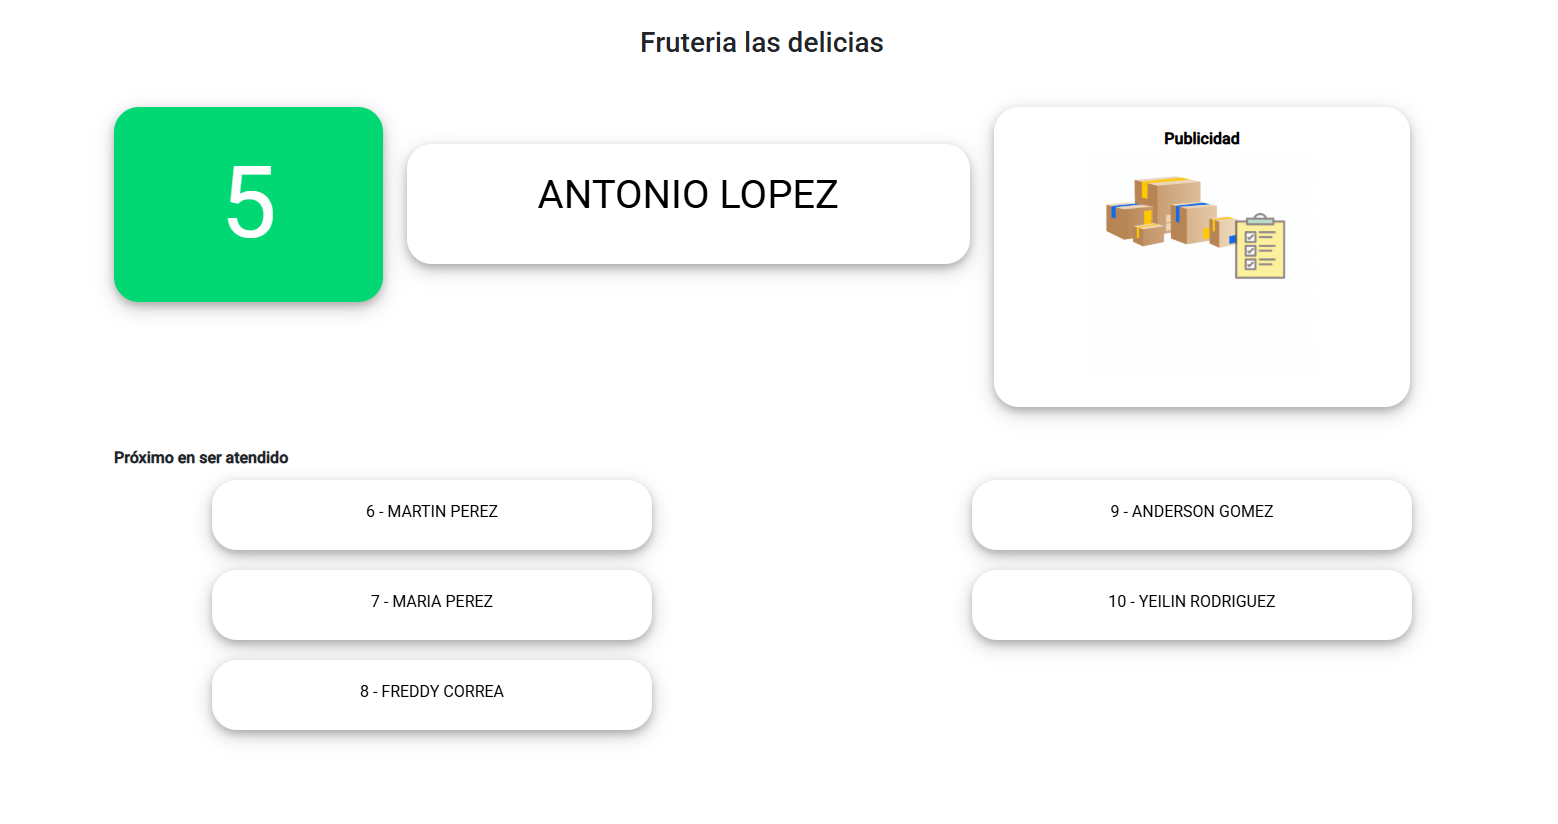
Here you can view the first 7 customers in the waiting list and who is currently being served. In this section, you can display the list in full-screen mode on a screen or monitor visible to the public, so that the current status of the waiting list is clearly displayed. To mark the first customer in the waiting queue as “Served” and move on to the next one, press the SPACE or ENTER key, or click the “Next Customer” button.
Waiting List
This feature allows you to view the complete list of customers in the queue and remove any customer you wish.
Generate Ticket
In this section, a QR code is generated, which you should print or show to your customers so they can scan it. Once the customer scans the QR code, a form will appear in their smartphone’s browser, where they will need to enter their first name, last name, and phone number (this last field is important so the customer can receive a notification on WhatsApp when it’s their turn).

11. Obtaining data stored in the cloud
To access the data generated in the cloud, you must access the directory called “SHOP TOOLS” and within it you will find a spreadsheet file with the generated data.


© 2026 Shop Tools Inc. All rights reserved.